A newly married couple, buying their first home, living a gluten free diet, remodeling a foreclosure, and expecting their first child. We love, we laugh, we debate, we enjoy life! This is us! www.RobandLori.us
Labels
- Everything Gluten Free (16)
- Gluten Free Restaurant Reviews (7)
- Gluten Free Recipes (5)
- Wedding (5)
- Home Remodeling (3)
- Animals (2)
- Baby (1)
- Gluten Free Beer (1)
- landscaping (1)
Showing posts with label Gluten Free Recipes. Show all posts
Thursday, July 28, 2011
Gluten Free Goat Cheese, Spinach, Basil, Mushroom Pizza
As my husband is not a fan of goat cheese, I usually make this tasty little pizza for lunch. It is fast and easy to make. First I buy some already made gluten free pizza crust by Rustic Crust which I purchased at Dierbergs.
I preheat the oven to 450 degrees. I first take one garlic clove, cut it in half and rub the garlic clove on both sides of the pizza crust. The package says to spread olive oil on the crust, however I am never able to get it to spread evenly, so I use the I can't believe its not better with oil spray and spray the pizza crust a few times. I chop up some fresh spinach and fresh basil and place it on the pizza crust. I then chop up some fresh mushrooms and it it to the pizza. Then I add the goat cheese! MMM! I try to spread it evenly over the pizza, so every bite has a yummy goat cheese. I add a little fresh pepper. By this time, I am just waiting on the oven to preheat.
I throw the pizza in the oven (not literally). The package says to put it directly on the rack, however I usually put my pizza on aluminum foil. Cook for 12 minutes and voila Pizza!!
Ingredients:
1 gluten free pizza crust
1 clove of garlic
A handful of fresh spinach
About two twigs of fresh basil
3 or 4 small mushrooms
A small package of goat chese
Tuesday, June 28, 2011
Summer Cold? Gluten Free French Oven Soup Makes it All Better.
Summer colds are the worst!! First I was sick for two whole weeks and just as I was feeling better my husband gets sick. Two days later it was my turn to be sick again. As we were both sick with summer colds; I made a nice winter meal to makes us feel better. I purchased all my ingredients from Dierbergs with the exception of the gluten free French bread, which we were able to find at the New Gluten Free bakery in Ellisville, New Day Cafe. I am a feeling they are going to be one of my new favorite places.
Take 1 and half pounds of thinly sliced yellow onions and slowly cook them in 3Tb of olive oil and 1TB of butter (I buy the real butter with no added salt instead of margarine). I use a 4 quart dutch oven saucepan for all steps. Cook the onions for about 15 minutes (covered) on low heat in the butter and oil mixture.
Uncover the saucepan and add 1 tsp of salt and 1/4 of tsp of sugar (this helps the onions to brown). Raise the heat to medium level for a good for 30-40 minutes, do not skip this step, as it helps to reduce the strong onion flavor.
Next take 3TB of all purpose gluten free flour and mix into onions and cook for 3 minutes.
Take the saucepan off the heat. Add 2 quarts of of boiling gluten free beef stock. Then add 1/2 cup of dry white wine; I usually use chardonnay. Simmer, partially covered, for 30-40 minutes.
While cooking the soup as directed above take several pieces of gluten free French bread and bake it until it is crunchy like a crouton. Then shred 2 cups of fresh Swiss cheese. Take the bread cut it up in bite size pieces (just makes it easier to eat) and the shredded cheese and place them into the oven safe soup bowls.
Once the soup is cooked, pour soup over bread and cheese mixture and take Swiss cheese slices and cover the soup bowl (this will depend on the size of the bowl). Take bowls and place them in the oven under broil for about 15 minutes or until the cheese is lightly browned. Then serve. It will need a couple of minutes to cool down.
I also like to serve garlic cheese bread with the soup. If you want to make that too, here are the instructions: Cut already baked gluten free French bread into about 1/4 inch slices, take a garlic clove and cut it in half and rub the cut side all over the bread slices. Pour a few drops of olive oil on one side of each slice and top with some shredded swiss cheese. Place under broiler for just a few minutes until cheese starts to brown.
Ingredients:
1 and half pounds of thinly sliced yellow onions
3 tablespoons of olive oil
1 tablespoon of butter
1 teaspoon of salt
1/4 of teaspoon of sugar
3TB of gluten free flour
2 quarts of gluten free beef stock
1/2 cup of dry white wine
One loaf of gluten free French bread
A block of fresh Swiss cheese
A glove of garlic
Gluten Free Black Forest Cake: Yum!
Wow! My husband and I have been married for a year now! Our wedding cake was a delicious gluten-filled Black Forest Cake from La Bonne Bouchée in Creve Coeur. They have some of the best desserts I have ever tasted.
The original plan was to have La Bonne Bouchée make a new cake for our wedding anniversary. However, we could have never imagined I would not be able to eat the cake a year later due to my gluten intolerance. I decided to take my chances and make our own gluten-free Black Forest Cake from scratch.
I was very happy to find all of the ingredients at Dierbergs. The cake turned out amazing and you would never know it was gluten free. My husband said it tasted even better than our wedding cake, but he’s my husband, so I am sure he is biased.
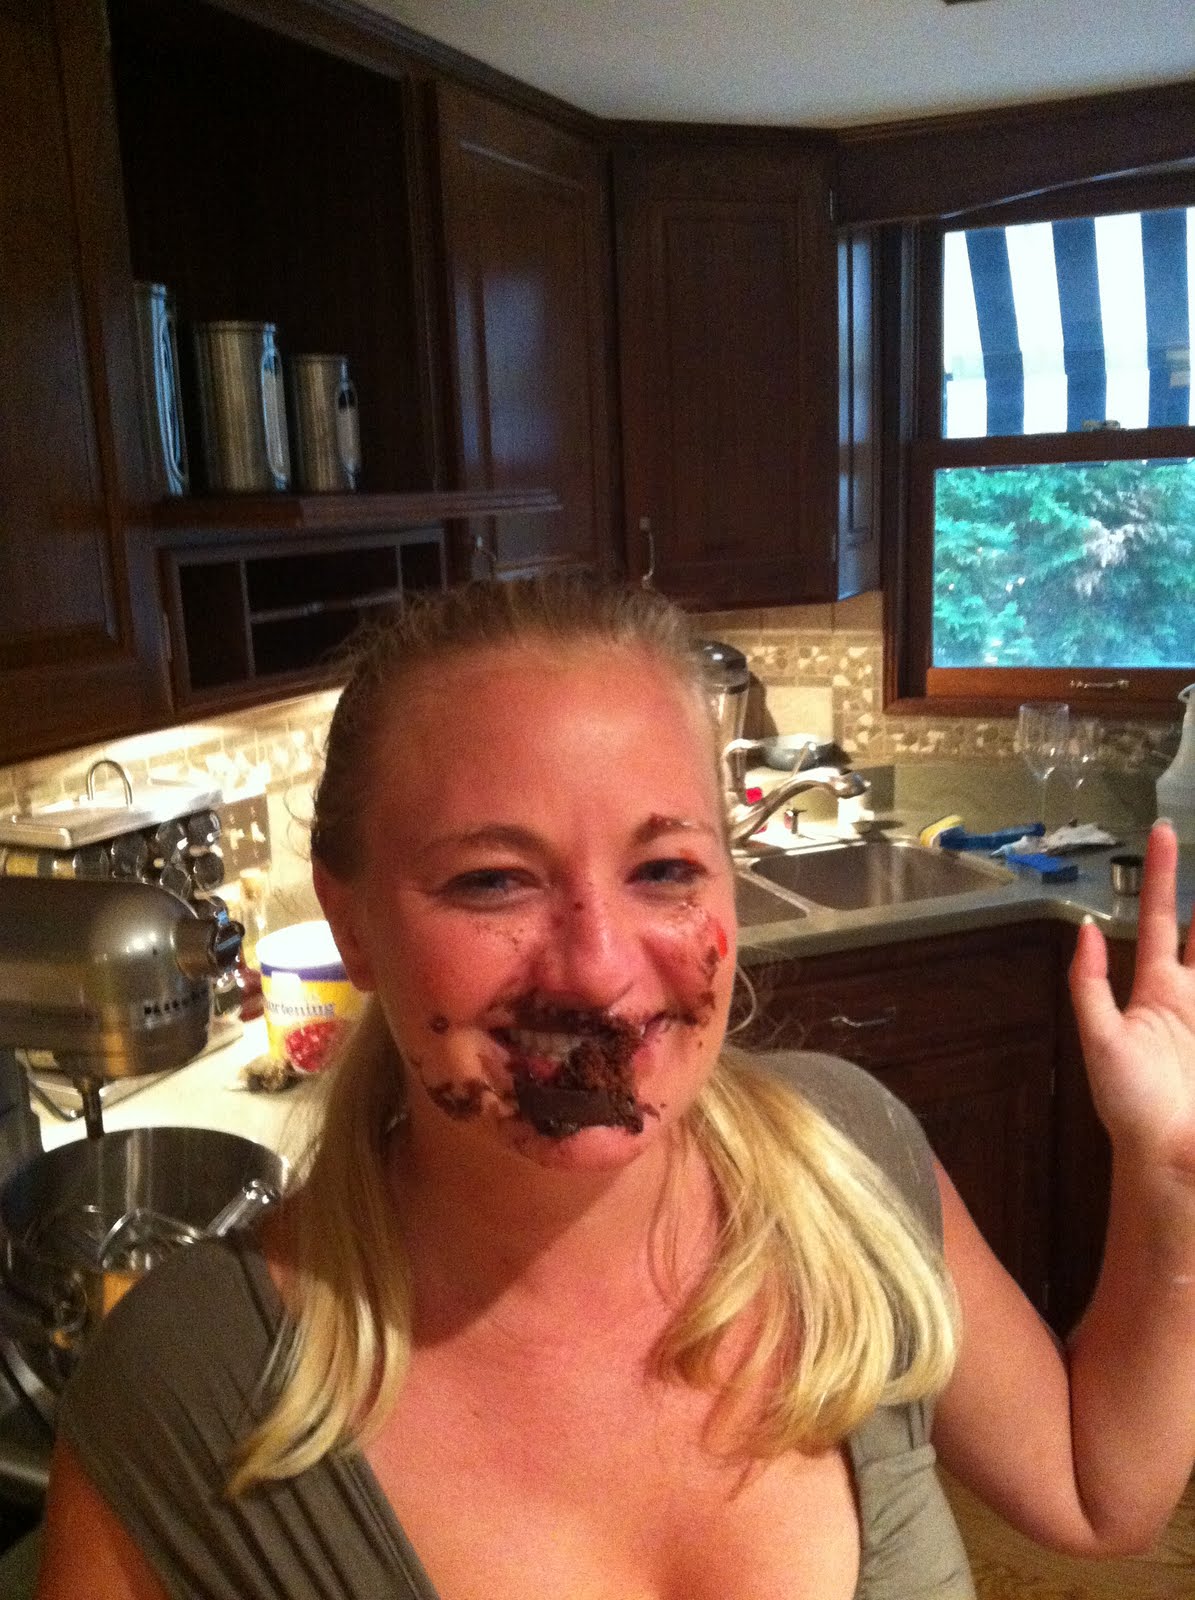
We had also agreed that if he did not shove cake on my face on our wedding day (I did not want my makeup to be messed up), he could shove as much cake as he wanted in my face on our anniversary. He happily obliged as you can see in the picture. Happy baking!
Ingredients:
The cake:
1 1/2 cups white rice flour
3/4 cups tapioca flour
1 teaspoon salt
1 teaspoon baking soda
3 teaspoons baking powder
1 teaspoon xanthan gum
4 eggs
1 1/4 cups white sugar
1 cup cocoa
2/3 cup mayonnaise
1 cup milk (dairy, soy or rice)
The frosting and filling:
2 blocks cream cheese (or substitute)
4 cups powdered sugar
1 cup cocoa
1 can cherry pie filling (gluten free)
The chocolate shavings:
1 bag of chocolate chips
2 tablespoons of vegetable shortening
To make the chocolate shavings:
Melt the bag of chocolate chips and the vegetable shortening in a chocolate melter (a sauce pan will work as well, however the chocolate melter reduces the chances of the chocolate getting too hot). Line a loaf pan of plastic Tupperware with aluminum foil. Pour the melted chocolate into the dish and refrigerate for 2 hours. Once the chocolate has hardened, take a vegetable peeler along the edges of the chocolate chunk. Change sides often as the heat from your hand will melt the chocolate.
To make the cake:
Preheat your oven to 350°F. Mix all dry ingredients except the cocoa and sugar in one bowl. Cream the eggs, sugar, mayo and cocoa in another bowl. Gradually add the dry ingredients to the egg mixture, alternating with the milk. Whip together with an electric mixer for at least 5 minutes or until well blended. Pour into 2 nine-inch greased pans, bake for 25 minutes or until a toothpick inserted in the center comes out clean. Allow to cool for 10 minutes, take cakes out of the pans and allow to cool for another 10 minutes.
Make the frosting:
Whip the cream cheese, sugar and cocoa together until well blended. Add water until the frosting is a thick, spreadable consistency; usually about a half a cup. Fill a frosting gun or bag with about 1/3 of the frosting and refrigerate till ready to use.
Assemble the cake:
Set one layer of cake on a plate. Spread a thin layer of frosting over the top of the cake, and frost the sides. Using the frosting gun or bag, pipe a rim of frosting around the outer edge of the cake (this is to hold the filling in, so don't skip this step!). Pipe swirls around the bottom of the cake. Fill the top of the first layer, inside the rim of frosting, with about 1/2 of the can of cherry pie filling. Place the second layer of cake on top. Put a layer of frosting on top of the second cake, and frost the sides. You will need to add extra frosting to the area where the two layers meet, to cover the gap and make sure no filling escapes. Pipe a rim of frosting around the top layer of the cake and add the rest of the cherry pie filling. Add the chocolate shavings on top.
Wednesday, April 13, 2011
The Best Homemade Gluten Free Lasagna Recipe!
My sister and her three kids were coming over to the house and I was trying to figure out what I could feed such a group of people. Then I remembered I owed Rob lasagna (from way before I was even started the gluten free diet), so I thought I would try it out. I have to admit on this exact lasagna I did not let everything simmer for as long as I should, since I did not have a lot of time after work and the kids (and Rob) were pretty hungry. I usually believe in the Julia Child method of letting things cook for awhile, so all the flavors meld together. Also, if you would like the non gluten free version of this recipe, just use regular lasagna noodles rather than the gluten free version. I served this 5 people who are not on the gluten free diet and they loved it! No one knew it was gluten free till I told them. :)
Here are the directions to this great lasagna:
1. In a Dutch oven, cook sausage, ground beef, onion, and garlic over medium heat until well browned.
2. Stir in crushed tomatoes, tomato paste, tomato sauce, and water. Season with sugar, basil, fennel seeds, nutmeg, Italian seasoning, 1 tablespoon salt, pepper, and 2 tablespoons parsley.
3. Simmer, covered, for about 1 1/2 hours, stirring occasionally. (This is where I cheated and only let it simmer about 20 mins, you can get away with this, but if you have time, simmer for the entire time.)
4. In a mixing bowl, combine ricotta cheese with egg, remaining parsley, and 1/2 teaspoon salt.
5. Preheat oven to 375 degrees F (190 degrees C).
6. To assemble, spread 1 1/2 cups of meat sauce in the bottom of a 9x13 inch baking dish. Arrange gluten free lasagna noodles (I used De Boles, as this is what my local grocery store had in stock) lengthwise over meat sauce. The best thing about the gluten free lasagna noodles is you do not have to boil them in water first, they are ready to be baked! Spread with one half of the ricotta cheese mixture. Top with a third of mozzarella cheese slices. Spoon 1 1/2 cups meat sauce over mozzarella, and sprinkle with 1/4 cup Parmesan cheese.
7. Repeat layers, and top with remaining mozzarella and Parmesan cheese.
8. Cover with foil: to prevent sticking, either spray foil with cooking spray, or make sure the foil does not touch the cheese.
9. Bake in preheated oven for 25 minutes. Remove foil, and bake an additional 25 minutes. Cool for 15 minutes before serving.
Please feel free to reach out to me with any questions!
Here is a list of ingredients:
Ingredients:
1 pound sweet Italian sausage 3/4 pound lean ground beef 1/2 cup minced onion 1 teaspoon of nutmeg 4 cloves garlic, crushed 1 (28 ounce) can crushed tomatoes 2 (6 ounce) cans tomato paste 2 (6.5 ounce) cans canned tomato sauce 1/2 cup water 2 tablespoons white sugar 1 1/2 teaspoons dried basil leaves 1/2 teaspoon fennel seeds | 1 teaspoon Italian seasoning 1 tablespoon salt 1/4 teaspoon ground black pepper 4 tablespoons chopped fresh parsley 12 lasagna noodles 16 ounces ricotta cheese 1 egg 1/2 teaspoon salt 3/4 pound mozzarella cheese, sliced 3/4 cup grated Parmesan cheese |
Thursday, March 3, 2011
Gluten Free Thin Mint Cookies, Super Easy and Oh so Yummy!
It is Girl Scout cookie time, but what about for those on a gluten free diet? Here's a recipe that tastes like the real thing! These are some of favorite cookies to make for many reasons: easy to make, very inexpensive, Gluten Free and they taste amazing like the real Thin Mint Cookies (oh and they are one of Rob's favorites.)
This is all you need:
Andes Baking Chips
Gluten Free Shortbread Cookies ( I used the Schar brand I found at my local grocery store Dierbergs)
Chocolate Melter
Baking Sheets
Wax Paper
Place Baking Pans in the refrigerator for a few minutes till they are chilled, this will help in the chocolate setting process. Heat the chocolate melter to melt, pour in the Andes baking chips and stir until all of the chocolate is completely melted. Once the chocolate is melted, change the chocolate melter to warm. Pull one of the baking sheets from the fridge place wax paper (or parchment paper) over it. Pick up the Shortbread cookies with thongs, fork, or even your fingers and dip the cookies into the chocolate completely covering the entire cracker, then place onto baking sheet. Immediately place cookies into the fridge, so they can set. They usually take less than a minute to set! Continue process until you run out of chocolate and/or cookies.
I recommend a nice Petit Syrah with the cookies . MMMMMM (or a nice glass of milk for the little ones.
Here are the ingredients I used:
Andes Baking Chips - 3/5 Lb Andes Baking Mints: GR


DELUXE CHOCOLATE MELTER

This is all you need:
Andes Baking Chips
Gluten Free Shortbread Cookies ( I used the Schar brand I found at my local grocery store Dierbergs)
Chocolate Melter
Baking Sheets
Wax Paper
Place Baking Pans in the refrigerator for a few minutes till they are chilled, this will help in the chocolate setting process. Heat the chocolate melter to melt, pour in the Andes baking chips and stir until all of the chocolate is completely melted. Once the chocolate is melted, change the chocolate melter to warm. Pull one of the baking sheets from the fridge place wax paper (or parchment paper) over it. Pick up the Shortbread cookies with thongs, fork, or even your fingers and dip the cookies into the chocolate completely covering the entire cracker, then place onto baking sheet. Immediately place cookies into the fridge, so they can set. They usually take less than a minute to set! Continue process until you run out of chocolate and/or cookies.
I recommend a nice Petit Syrah with the cookies . MMMMMM (or a nice glass of milk for the little ones.
Here are the ingredients I used:
Andes Baking Chips - 3/5 Lb Andes Baking Mints: GR
DELUXE CHOCOLATE MELTER
Subscribe to:
Posts (Atom)